
Recipe – Venison Pastrami
- Marches Deer Management

- Jun 4
- 4 min read
Updated: Jun 5
With this post I would like to share a recipe I have been making a lot over the last year, Venison Pastrami. My daughter loves cured meats so this always goes down well, rarely lasting more than one sitting regardless the amount I make.

When I worked in kitchens, we used to make all kinds of cured meats and pigeon pastrami was a favourite, now I tend to make it using venison as I get more return for less fiddly work. Preparation and patience are key with this recipe, it takes several days and requires brining, smoking and the water bath, but the end product is worth it. I always use roe as that’s what I have on hand, and generally I use a whole muscle out of the haunch but I made some at Christmas out of saddle and it was excellent. Served best during the summer, alfresco in a sourdough sandwich with cheese, lots of pickles and lashings of mustard. It would be bad form not to drink a beer of your choice whilst you eat to reward your three days of work. I prefer Augustiner Bier Helles.
Ingredients
· Any large muscle group from the haunch, trimmed and external sinew removed
For the brine
· Curing salt, any sodium nitrate salt will work
· Dark sugar
· Black peppercorns
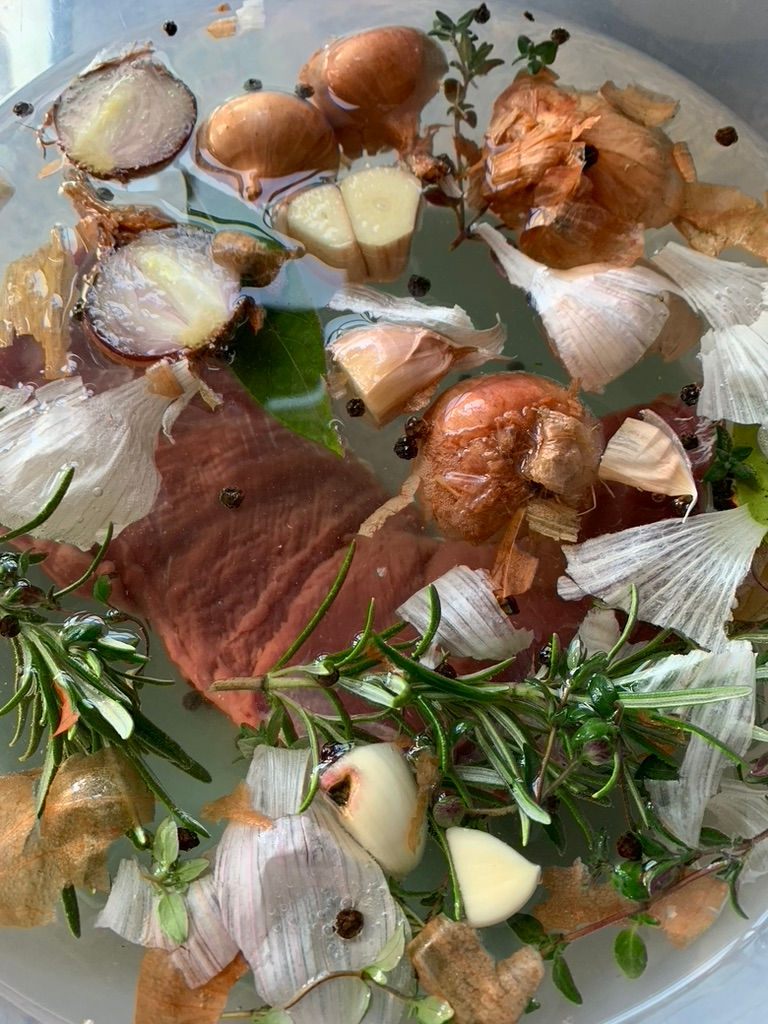
· Hard herbs, any work but I like bay and thyme in my mix
· Couple of garlic cloves
To finish
· Rapeseed oil
· Black pepper
Method
Brining
You need a bowl large enough to completely cover your chosen cut of meat. Take that bowl and add the curing salt, pepper, sugar, garlic and hard herbs. I normally use a topside from a roe so for this sized piece I would use approximately 100g of salt and 50g of sugar. It is important to use a curing salt like sodium nitrate as sodium chloride sea salt will burn your meat. Mix cold water into the bowl ensuring that all sugar and salt dissolves by stirring and also ensuring there will be enough water level to completely submerge the cut. Place the meat into the brine and ensure its covered in water by placing a sieve or colander over the top of the joint to weigh it down in the water if needed. Put it all in the fridge and wait for 24h at a minimum.
Drying
After a 24h soak it is ready to come out, you will notice the texture of the outside has changed and the meat will almost have a light jelly translucence to the exterior. This is normal. The meat will require patting dry with paper towels being careful to make sure that no bits of paper towel stick to the exterior of the meat. When you have it dry, put a hook through the meat and hang it in your fridge with a plate underneath it for 24h at a minimum to dry it out. If you don’t have a hook, you can lay it on a ceramic plate but you will need to periodically turn it so that all sides dry evenly.

Smoking
This is the part of the process that will make or break your two days of waiting so far. I cold smoke the meat in a fairly rudimentary way. I light a small fire in the smoker with a mix of dry and green wood, I don’t really mind what wood as long as its split from a hardwood log. Apple works well but I don’t personally believe there is much difference in the smoke flavour and have successfully used sally, ash and oak; essentially whatever is at hand is fine. Once it is going it needs retarding, by spreading the burning wood out and ideally cutting off as much air as possible, though misting it with a spray bottle works ok. I don’t want to extinguish completely and a few embers that smoke are what is desired. Place your meat into the smoker and shut the door and chimney so it really fills up the smoker compartment. 25 to 40 minutes is more than enough and experience will tell you how long is best, you don’t want to cook the meat at all, just impart flavour.

Water bath / poaching
I always use the water bath for any precise temperature cooking but you could always poach. Whichever cooking route you choose, first you will need to tightly wrap your meat in clingfilm. I lay out two flat pieces next to one another and a third piece straddling the two, and flatten all the air out with kitchen roll. I place the meat around 1/3 of the way up the clingfilm and then turn the section nearest you over the top and begin to roll it tightly up. Once you have got to the top you will have two big thick clingfilm sections with nothing in. Tie a knot in one end and then the other and cut the loose ends off. Respect the ingredients. You should end up with something like the picture below. I then place mine into a sous vide bag and place in a preheated water bath at 78 centigrade for 25 minutes. Immediately take the meat out and plonge in the coldest water you can get with ice to cease all cooking. I would leave it in the fridge for several hours after plonging.

If you were to poach the meat then place it in lightly simmering water for around 30 minutes until you can feel the change in texture and again plonge in an ice bath to retard the cooking process followed by a stint in the fridge.
Finishing
You are nearly done. When your pastrami is cold, unwrap it and dry it off discarding any cooking juices. When it is dry lightly coat the pastrami in some rapeseed oil and then grind a good deal of black pepper all over the exterior. The pepper should stick easily. Rewrap your creation in clingfilm and it is ready to slice thinly and eat right there. I don’t know how long it could keep in the fridge after making as it never lasts that long here, but I would assume with sensible storage a week should be no problem.


Comments